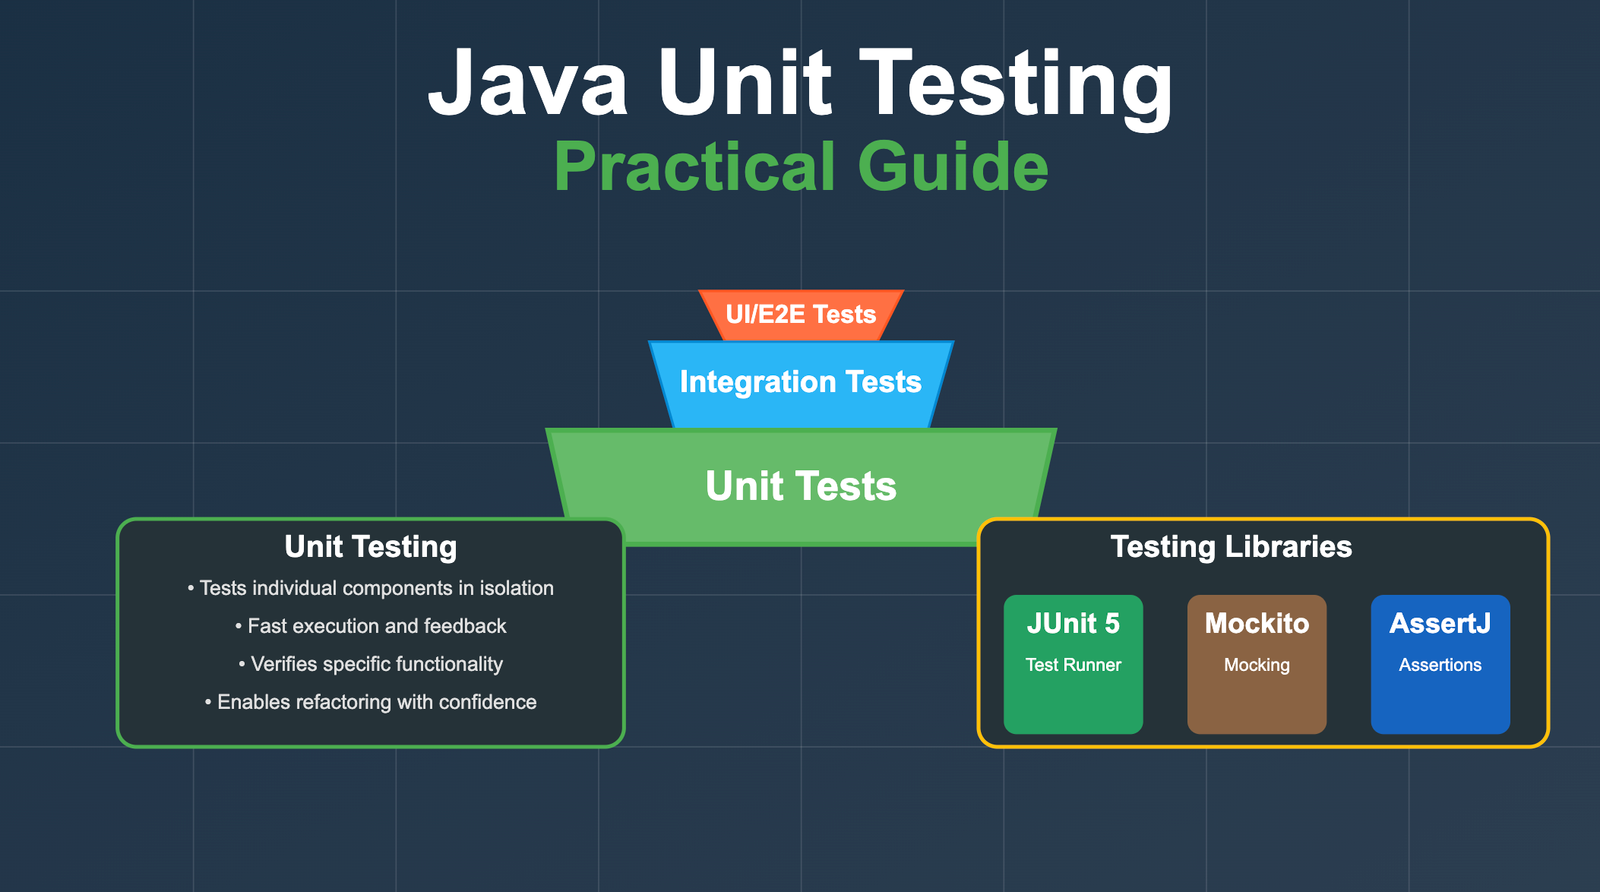
Like most of the developers, writing unit tests is the least interesting part of the software development process for me. But it is an integral part because it helps us in the future on the below points:
Now let us go through the basics of unit testing in Java, focusing on JUnit, Mockito and AssertJ. This guide will cover the essential concepts, best practices, and real-world examples to help you write effective unit tests.
Add these dependencies to your Maven or Gradle project:
Maven:
<dependency>
    <groupId>org.junit.jupiter</groupId>
    <artifactId>junit-jupiter</artifactId>
    <version>5.10.5</version>
    <scope>test</scope>
</dependency>
<dependency>
    <groupId>org.mockito</groupId>
    <artifactId>mockito-core</artifactId>
    <version>5.11.0</version>
    <scope>test</scope>
</dependency>****
Gradle:
testImplementation 'org.junit.jupiter:junit-jupiter:5.10.5'
testImplementation 'org.mockito:mockito-core:5.11.0'
If you are using Spring Boot, you can use the
spring-boot-starter-testdependency, which includes JUnit 5 and Mockito by default.
| Annotation | Library | Description |
|---|---|---|
@Test | JUnit | Marks a method as a test case. |
@BeforeEach | JUnit | Runs before each test method. |
@AfterEach | JUnit | Runs after each test method. |
@BeforeAll | JUnit | Runs once before all test methods in the class (static). |
@AfterAll | JUnit | Runs once after all test methods in the class (static). |
@Disabled | JUnit | Disables a test method or class. |
@Nested | JUnit | Allows grouping of related tests in inner classes. |
@ParameterizedTest | JUnit | Marks a method as a parameterized test. |
@CsvSource | JUnit | Provides CSV input for parameterized tests. |
@DisplayName | JUnit | Specifies a custom display name for a test class or method. |
@Timeout | JUnit | Sets a timeout for a test method or all methods in a class. |
@Mock | Mockito | Creates and injects a mock instance. |
@InjectMocks | Mockito | Injects mock fields into the tested object. |
@Spy | Mockito | Creates a spy of a real object. |
@Captor | Mockito | Allows capturing arguments passed to mocks. |
@ExtendWith | JUnit | Registers extensions (e.g., MockitoExtension for Mockito integration). |
@TempDir | JUnit | Creates a temporary directory for tests. |
Now let's go through some practical examples to illustrate how to use these annotations effectively.
@Test, @BeforeEach, @AfterEach, @BeforeAll, @AfterAllimport org.junit.jupiter.api.*; class CalculatorTest { static Calculator calculator; @BeforeAll // Runs once before all tests. You can do setup here common to all tests. static void initAll() { calculator = new Calculator(); } @BeforeEach // Runs before each test. We can do anything that need to be done before each test. void init() { calculator.reset(); } @Test void testAddition() { //Actual test method Assertions.assertEquals(5, calculator.add(2, 3)); } @AfterEach // Runs after each test. We can do anything that need to be done after each test. void tearDown() { } @AfterAll// Runs once after all tests. You can do cleanup here common to all tests. static void tearDownAll() { } }
Assertions class@Test void testBasicAssertions() { // Call the actual method Calculator calculator = new Calculator(); int sum = calculator.add(5, 3); double squareRoot = calculator.squareRoot(16); boolean isEven = calculator.isEven(10); // Basic assertions assertEquals(8, sum, "5 + 3 should equal 8"); assertTrue(isEven, "10 should be even"); assertFalse(calculator.isEven(7), "7 should not be even"); assertEquals(4.0, squareRoot, "Square root of 16 should be 4"); assertNotEquals(0, sum, "Sum should not be zero"); assertNotNull(calculator, "Calculator should not be null"); }
JUnit provides various assertion methods to validate expected outcomes:
assertEquals(expected, actual): Verifies values are equalassertTrue(condition): Checks if a condition is trueassertFalse(condition): Checks if a condition is falseassertNotNull(object): Verifies an object is not nullassertNotEquals(unexpected, actual): Verifies values are not equalThe optional message parameter in each assertion helps clarify the test's purpose and makes failure messages more informative for debugging.
@Disabled@Test @Disabled("Feature not implemented yet") void testSubtraction() { // This test will be skipped }
@NestedPurpose:
@BeforeEach, @AfterEach, etc.When to Use:
class OrderServiceTest {
    OrderService orderService = new OrderService();

    @BeforeEach
    void setUp() {
        // common setup logic for all tests

    @Nested
    class CreateOrderTests {
        @Test
        void testCreateOrderSuccess() {
            // test logic
        }

        @BeforeEach
        void setUp() {
            // setup logic for create order tests
        }

    }

    @Nested
    class CancelOrderTests {
        @Test
        void testCancelOrderSuccess() {
            // test logic
        }

        @BeforeEach
        void setUp() {
            // setup logic for cancel order tests
        }

    }
}
class StringUtilsTest {
    @ParameterizedTest
    @CsvSource({
        "hello,HELLO",
        "world,WORLD"
    })
    void testToUpper(String input, String expected) {
        Assertions.assertEquals(expected, StringUtils.toUpper(input));
    }
}
@CsvSource allows you to provide multiple sets of parameters in a CSV format. Each line represents a different set of parameters for the test method.
@MethodSource and Java RecordsFor more complex test data or when you need structured objects, @MethodSource is ideal, especially with Java records:
@ParameterizedTest
@MethodSource("discountTestCases")
void testDiscountCalculation(DiscountTestCase testCase) {
    OrderDiscountCalculator calculator = new OrderDiscountCalculator();

    BigDecimal actualDiscount = calculator.calculateDiscount(
        testCase.amount(),
        testCase.customerType(),
        testCase.isHoliday()
    );

    assertEquals(testCase.expectedDiscount(), actualDiscount);
}

// Using a record for clean, immutable test data
record DiscountTestCase(
    BigDecimal amount, CustomerType customerType, boolean isHoliday,BigDecimal expectedDiscount
) {}

// Method source providing test data
static Stream<DiscountTestCase> discountTestCases() {
    return Stream.of(
        new DiscountTestCase(
            new BigDecimal("50.00"), CustomerType.REGULAR, false, new BigDecimal("0.00")
        ),
        new DiscountTestCase(
            new BigDecimal("120.00"), CustomerType.PREMIUM, false, new BigDecimal("12.00")
        ),
        new DiscountTestCase(
            new BigDecimal("100.00"), CustomerType.VIP, true, new BigDecimal("20.00")
        )
    );
}
Similar to @CsvSource and @MethodSource, there are other parameterized test sources, some common ones are:
@ValueSource: Provides a single value or array of values.@EnumSource: Provides values from an enum.@ArgumentsSource: Provides parameters from a custom source.@NullSource: Provides null as a parameter.@EmptySource: Provides an empty string as a parameter.@NullAndEmptySource: Provides both null and empty string as parameters.@CsvFileSource: Provides parameters from a file.@FieldSource: Provides parameters from a field.If the class you are testing has dependencies, you can use Mockito to create mocks of those dependencies. This allows you to isolate the unit under test and control its behavior.
Suppose you have a PaymentService class that depends on a PaymentGateway interface:
public class PaymentService {
    private final PaymentGateway paymentGateway;
    private final Logger logger;

    public PaymentService(PaymentGateway paymentGateway, Logger logger) {
        this.paymentGateway = paymentGateway;
        this.logger = logger;
    }

    public boolean processPayment(double amount) {
        boolean success = paymentGateway.charge(amount);
        if (success) {
            logger.log("Payment processed: " + amount);
        }
        return success;
    }
}
We can write a unit test for PaymentService using Mockito to mock the PaymentGateway and Logger dependencies
Basically we can write tests with the below steps:
@ExtendWith(MockitoExtension.class)
class PaymentServiceTest {
    @Mock
    PaymentGateway paymentGateway;

    @Spy
    Logger logger = new Logger();

    @InjectMocks
    PaymentService paymentService;

    @Captor
    ArgumentCaptor<Double> amountCaptor;

    @Test
    void testProcessPayment_Success() {
        // Given
        when(paymentGateway.charge(anyDouble())).thenReturn(true);

        // When
        boolean result = paymentService.processPayment(100.0);

        // Then
        assertTrue(result);
        verify(paymentGateway).charge(amountCaptor.capture());
        assertEquals(100.0, amountCaptor.getValue());
        verify(logger).log("Payment processed: 100.0");
    }
}
@Mock, @InjectMocks, etc.PaymentGateway class. After that when we call any method invocation will be on the mock object.Logger class, allowing you to verify interactions with it. We can use @Spy when we want to use the real object but still want to verify interactions with it.PaymentService and injects the mock PaymentGateway into it.charge method of the PaymentGateway mock.true when the charge method is called with any double value.charge method was called with the captured amount and that the logger logged the expected message.@Test void testConsecutiveCalls() { // First call returns true, subsequent calls return false when(connectionPool.getConnection()) .thenReturn(new Connection()) // first call .thenReturn(new Connection()) // second call .thenThrow(new ConnectionException()); // third call assertNotNull(service.connect()); // first call works assertNotNull(service.connect()); // second call works assertThrows(ServiceException.class, () -> service.connect()); // third call fails }
@Test
void testNoUnwantedInteractions() {
    paymentService.validateAmount(50.0);

    // Verify that only validation happened, no actual payment processing
    verify(validator).validate(50.0);
    verifyNoInteractions(paymentGateway, logger);

    // Or verify no more interactions beyond what we've already verified
    verifyNoMoreInteractions(validator);
}
@DisplayName@Test @DisplayName("Addition: 2 + 3 should equal 5") void testAddition() { Assertions.assertEquals(5, calculator.add(2, 3)); } @Nested @DisplayName("When dividing numbers") class DivisionTests { @Test @DisplayName("Should return correct result for valid inputs") void testValidDivision() { assertEquals(2, calculator.divide(10, 5)); } @Test @DisplayName("Should throw exception when dividing by zero") void testDivisionByZero() { assertThrows(ArithmeticException.class, () -> calculator.divide(10, 0)); } }
Using @DisplayName makes your test reports more readable and descriptive, especially when tests fail. They appear in IDEs and test reports with the custom name instead of the method name.
@Test
void testThrowsException() {
    assertThrows(IllegalArgumentException.class, () -> {
        calculator.divide(10, 0);
    });
}
@Captor@Captor ArgumentCaptor<String> stringCaptor; @Test void testLoggerCalledWithCorrectMessage() { paymentService.pay(50.0); verify(logger).log(stringCaptor.capture()); assertEquals("Payment processed: 50.0", stringCaptor.getValue()); }
JUnit provides a way to conditionally execute tests based on certain conditions being met. Tests that don't meet the assumptions are skipped rather than failing.
@Test
void testRunsOnlyInDevelopmentEnvironment() {
    // Skip this test if not in development environment
    assumeTrue("dev".equals(System.getenv("ENV")),
               "Test runs only in development environment");

    // Test code here - only executes if the assumption is valid
}

@Test
void testWithMultipleAssumptions() {
    // Skip if any assumption is not met
    assumingThat(System.getProperty("os.name").contains("Linux"), () -> {
        // This code runs only on Linux
        assertEquals(10, linuxSpecificOperation());
    });

    // This code runs regardless of OS
    assertEquals(42, platformAgnosticOperation());
}
JUnit provides straightforward ways to test Java collections. Here are key approaches focusing on standard JUnit assertions:
@Test
void testBasicCollectionOperations() {
    List<String> fruits = Arrays.asList("apple", "banana", "orange");

    // Size and content verification
    assertEquals(3, fruits.size());
    assertTrue(fruits.contains("apple"));
    assertFalse(fruits.contains("grape"));

    // Testing equality
    List<String> expected = Arrays.asList("apple", "banana", "orange");
    assertEquals(expected, fruits);
}
@Test
void testCollectionOfObjects() {
    record Product(String name, double price, String category) {}

    List<Product> products = List.of(
        new Product("Laptop", 1200.0, "Electronics"),
        new Product("Book", 15.0, "Literature"),
        new Product("Monitor", 250.0, "Electronics")
    );

    assertEquals(3, products.size());

    // Count electronics products
    long electronicsCount = products.stream()
        .filter(p -> p.category().equals("Electronics"))
        .count();
    assertEquals(2, electronicsCount);

    // Verify specific products exist
    boolean hasLaptop = products.stream()
        .anyMatch(p -> p.name().equals("Laptop"));
    assertTrue(hasLaptop);
}
AssertJ provides more fluent and expressive assertions for collections, making it easier to read and understand the tests. We will cover this later in the article.
@TimeoutJUnit provides built-in support for testing that methods complete within a specified time:
@Test
@Timeout(value = 500, unit = TimeUnit.MILLISECONDS)
void testMethodCompletesQuickly() {
    // This test will fail if it takes longer than 500ms
    service.performFastOperation();
}

// You can also apply timeout to all methods in a class
@Timeout(10)
class PerformanceSensitiveTest {
    // All tests in this class will fail if they take longer than 10 seconds
}

// Or use the assertions API for more complex timeout scenarios
@Test
void testAsyncOperation() {
    // Test that an asynchronous operation completes within 5 seconds
    assertTimeoutPreemptively(Duration.ofSeconds(5), () -> {
        return service.asyncOperation();
    });
}
Timeout testing is essential for:
While JUnit provides basic assertions with Assertions class, modern testing often benefits from more expressive and fluent assertion libraries like AssertJ and Hamcrest. Out of these two, AssertJ is the most popular one.
Add the below dependency to your Maven or Gradle project:
Maven:
		<dependency>
			<groupId>org.assertj</groupId>
			<artifactId>assertj-core</artifactId>
			<version>3.27.3</version>
			<scope>test</scope>
		</dependency>
If you are using Spring Boot, you can use the
spring-boot-starter-testdependency, which includes AssertJ by default.
AssertJ provides a more fluent API with better readability and error messages:
// String assertions
assertThat("hello").startsWith("he").endsWith("lo").hasSize(5);

// Collection assertions
assertThat(List.of("apple", "banana", "orange"))
    .hasSize(3)
    .contains("apple")
    .doesNotContain("kiwi");

record Customer(String name, int age) {}
var customerList = List.of(new Customer("John",25), new Customer("Jane",23), new Customer("Doe", 30));
assertThat(customerList)
    .extracting(Customer::name)
    .containsExactly("John", "Jane", "Doe");

// Exception assertions
assertThatThrownBy(() -> divide(10, 0))
    .isInstanceOf(ArithmeticException.class)
    .hasMessageContaining("zero");

// Object assertions with property extraction
var customer = getCustomer();
assertThat(customer)
    .extracting(Customer::name, Customer::age)
    .containsExactly("John", 25);

// Map assertions
assertThat(map)
    .containsEntry("key1", "value1")
    .doesNotContainKey("key2")
    .hasSize(2);

// Date assertions
assertThat(date)
    .isAfter(LocalDate.of(2023, 1, 1))
    .isBefore(LocalDate.of(2024, 1, 1));

// Regex assertions
assertThat("abc123").matches("[a-z]{3}\\d{3}");
Static methods present a challenge for unit testing because they're globally accessible and not typically dependency-injected. Mockito provides the ability to mock static methods with its mockStatic() API.
Imagine we have a utility class with static methods:
public class DateTimeUtils {
    public static LocalDate getCurrentDate() {
        return LocalDate.now();
    }

    public static boolean isWeekend(LocalDate date) {
        DayOfWeek dayOfWeek = date.getDayOfWeek();
        return dayOfWeek == DayOfWeek.SATURDAY || dayOfWeek == DayOfWeek.SUNDAY;
    }
}
And a service that uses it:
public class WorkdayService {
    public boolean isBusinessDay() {
        return !DateTimeUtils.isWeekend(DateTimeUtils.getCurrentDate());
    }
}
Here's how to test this with static mocking:
class WorkdayServiceTest {

    @Test
    void testIsBusinessDay() {
        // Static mocking done in a try-with-resources block so that mock is closed automatically
        try (MockedStatic<DateTimeUtils> mockedDateUtils = Mockito.mockStatic(DateTimeUtils.class)) {
            // Setup static mock to return Monday (business day)
            LocalDate monday = LocalDate.of(2023, 5, 15); // A Monday
            mockedDateUtils.when(DateTimeUtils::getCurrentDate).thenReturn(monday);

            WorkdayService service = new WorkdayService();
            assertTrue(service.isBusinessDay());

            // Verify the static method was called
            mockedDateUtils.verify(DateTimeUtils::getCurrentDate);

            // Now test for weekend
            LocalDate saturday = LocalDate.of(2023, 5, 20); // A Saturday
            mockedDateUtils.when(DateTimeUtils::getCurrentDate).thenReturn(saturday);

            assertFalse(service.isBusinessDay());
        }
    }
}
Soft assertions allow you to collect multiple failures in a single test run instead of stopping at the first failed assertion. This is particularly useful when validating complex objects with multiple properties or when performing multiple validations in a single test.
The most elegant way I have seen is to use soft assertions with AssertJ is with AutoCloseableSoftAssertions in a try-with-resources block:
class UserSoftAssertionTest {
    @Test
    void testUserWithSoftAssertions() {
        User user = new User("john", "john@example.com", 17);

        try (AutoCloseableSoftAssertions softly = new AutoCloseableSoftAssertions()) {
            softly.assertThat(user.getUsername())
                  .as("Username validation")
                  .isNotEmpty()
                  .startsWith("K") // This will fail but test continues
                  .hasSize(4);

            softly.assertThat(user.getEmail())
                  .as("Email validation")
                  .contains("@")
                  .endsWith(".com");

            softly.assertThat(user.getAge())
                  .as("Age validation")
                  .isGreaterThan(18);

        }
    }
}
JUnit 5 also provides a built-in mechanism for soft assertions using assertAll():
@Test
void testUserWithJUnitGroupedAssertions() {
    User user = new User("john", "john@example.com", 17);

    assertAll("User validation",
        () -> assertEquals("john", user.getUsername(), "Username should match"),
        () -> assertTrue(user.getEmail().contains("@"), "Email should contain @"),
        () -> assertTrue(user.getAge() >= 18, "User should be an adult") // Fails but other assertions run
    );
}
Soft assertions are valuable when:
@AfterEach or @AfterAll if needed.Unit tests are fast and focused, but integration tests are needed when:
For Spring Boot projects, see: Spring Boot Integration Testing
Unit testing is essential for building reliable applications. By leveraging JUnit, Mockito,AssertJ and best practices, you can write tests that are easy to maintain and provide confidence in your codebase. Start small, test often, and let your tests guide your design!
To stay updated with the latest tutorials and tips on Java, Spring, and modern software development, follow me:
Learn how to create efficient integration tests for your Spring Boot APIs using Testcontainers and the Rest Assured library. This blog will guide you through building fluent integration tests for an API that interacts with MongoDB and AWS S3.
Comprehensive guide to Spring Data JPA with practical examples and best practices. Learn how to effectively use JPA in Spring Boot applications.
Find the most popular YouTube creators in tech categories like AI, Java, JavaScript, Python, .NET, and developer conferences. Perfect for learning, inspiration, and staying updated with the best tech content.
Get instant AI-powered summaries of YouTube videos and websites. Save time while enhancing your learning experience.