WebSocket is a communication protocol that enables real-time, bidirectional data exchange between clients and servers. Unlike traditional HTTP, which follows a request-response pattern, WebSocket maintains a persistent connection, making it ideal for applications requiring live updates like chat systems, gaming, or financial tickers.
WebSocket establishes a TCP connection through an HTTP handshake, then upgrades it to a WebSocket connection.
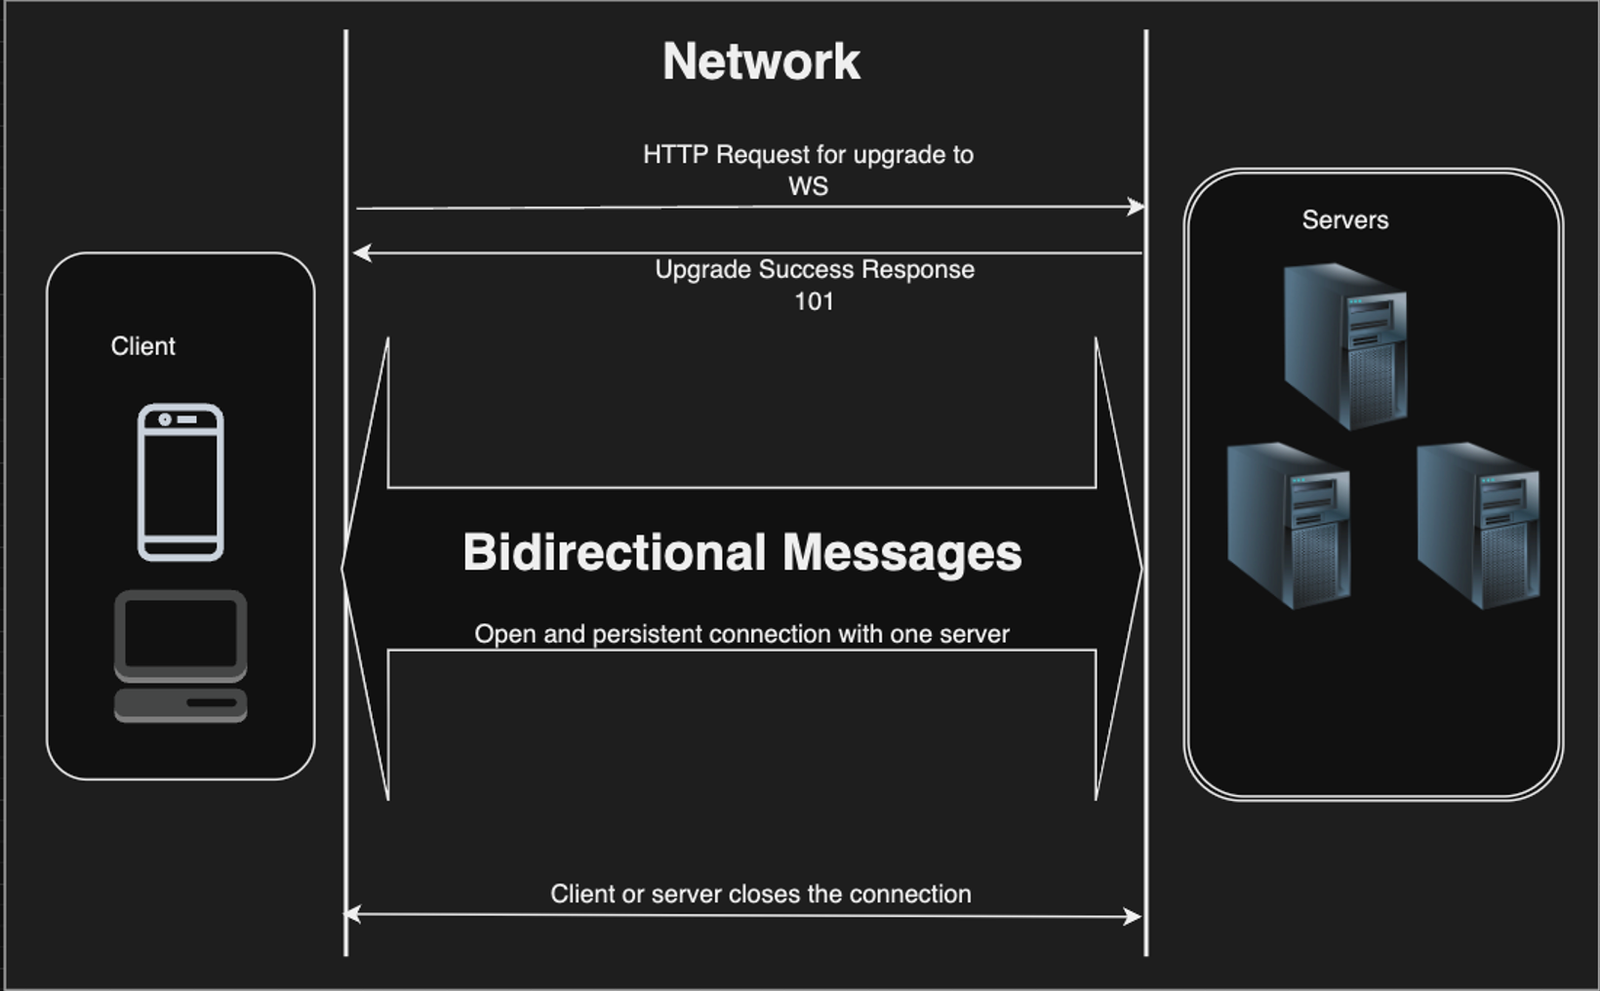
WebSocket connections start with an HTTP request containing special upgrade headers (Upgrade: websocket, Connection: Upgrade). The server acknowledges with a 101 Switching Protocols response, establishing a persistent TCP connection. This upgraded connection enables real-time, bidirectional communication between client and server.
GET /chat HTTP/1.1
Upgrade: websocket
Connection: Upgrade
Sec-WebSocket-Key: dGhlIHNhbXBsZSBub25jZQ==
HTTP/1.1 101 Switching Protocols
Upgrade: websocket
Connection: Upgrade
Sec-WebSocket-Accept: s3pPLMBiTxaQ9kYGzzhZRbK+xOo=
This allows:
Spring Boot offers two ways to implement WebSockets:
Let's explore both approaches by building a simple chat application.
First, let us create a new Spring Boot project with WebSocket support. Go to Spring Initializr and generate a new project with the following dependencies:
<dependency>
    <groupId>org.springframework.boot</groupId>
    <artifactId>spring-boot-starter-web</artifactId>
</dependency>
<dependency>
    <groupId>org.springframework.boot</groupId>
    <artifactId>spring-boot-starter-websocket</artifactId>
</dependency>
Let's start with simple WebSocket implementation.
Create a handler to manage WebSocket connections:
@Component
public class ChatWebSocketHandler extends TextWebSocketHandler {

    private final CopyOnWriteArrayList<WebSocketSession> sessions = new CopyOnWriteArrayList<>();

    @Override
    public void afterConnectionEstablished(WebSocketSession session) throws Exception {
        sessions.add(session);
    }

    @Override
    protected void handleTextMessage(WebSocketSession session, TextMessage message) throws Exception {
        for (WebSocketSession webSocketSession : sessions) {
            if(!webSocketSession.getId().equals(session.getId())) {
                webSocketSession.sendMessage(message);
            }
        }
    }

    @Override
    public void afterConnectionClosed(WebSocketSession session, CloseStatus status) throws Exception {
        sessions.remove(session);
    }
}
The ChatWebSocketHandler is the main component that manages WebSocket connections and messaging in our application. It extends TextWebSocketHandler, allowing it to handle text-based WebSocket messages. If you need to handle binary messages, you can extend BinaryWebSocketHandler instead.
afterConnectionEstablished is called when a new WebSocket connection is established. We add the new session to the list of active sessions. CopyOnWriteArrayList is used to store WebSocket sessions safely across multiple threads.
handleTextMessage is invoked when a new text message is received. We broadcast the message to all connected sessions except the sender.
afterConnectionClosed is called when a WebSocket connection is closed. We remove the closed session from the list of active sessions.
@Configuration
@EnableWebSocket
public class WebSocketConfig implements WebSocketConfigurer {

    @Autowired
    private ChatWebSocketHandler chatWebSocketHandler;

    @Override
    public void registerWebSocketHandlers(WebSocketHandlerRegistry registry) {
        registry.addHandler(chatWebSocketHandler, "/chat");
    }
}
The WebSocketConfig class configures the WebSocket endpoint /chat to use the ChatWebSocketHandler for handling WebSocket connections.
Now we can start our server and test the WebSocket connection. You can use postman or any other WebSocket client to connect to the server.
STOMP is a messaging protocol that simplifies WebSocket communication by providing higher-level messaging semantics. This was originally developed for interoperability with message brokers like RabbitMQ and ActiveMQ.
Using STOMP (Simple Text Oriented Messaging Protocol) with WebSocket provides several advantages:
@Configuration
@EnableWebSocketMessageBroker
public class WebSocketConfig extends AbstractWebSocketMessageBrokerConfigurer {

    @Override
    public void configureMessageBroker(MessageBrokerRegistry config) {
        config.enableSimpleBroker("/topic");
        config.setApplicationDestinationPrefixes("/app");
    }

    @Override
    public void registerStompEndpoints(StompEndpointRegistry registry) {
        registry.addEndpoint("/chat").withSockJS();
    }
}
@EnableWebSocketMessageBroker enables WebSocket message handling with STOMP support. We configure the message broker to enable simple message routing with a broker prefix /topic and an application destination prefix /app. Any message sent to /topic will be now routed to all the connected clients subscribed to the corresponding topic. Here we are using a simple in-memory message broker. In a production environment, you can replace it with a more robust message broker like RabbitMQ or ActiveMQ.
SockJS(withSockJS()) is used to provide fallback options for browsers that do not support WebSocket natively. It uses HTTP long-polling to simulate WebSocket behavior.
Now let us add a REST endpoint which will accept a message and send it to the topic /topic/messages which will be broadcasted to all the connected clients.
@Controller
public class ChatWebSocketController {

    private final SimpMessagingTemplate template;

    public ChatWebSocketController(SimpMessagingTemplate template) {
        this.template = template;
    }

    @MessageMapping("/chat")
    @SendTo("/topic/messages")
    public String handleTextMessage(String message) {
        return message;
    }
}
Now we will create a simple HTML page to interact with the WebSocket server. We will use SockJS and STOMP client libraries to connect to the WebSocket server and send/receive messages. We will have this in src/main/resources/static/chat.html so that it can be accessed at http://localhost:8080/chat.html.
<!DOCTYPE html>
<html>
<head>
    <title>WebSocket Chat</title>
    <script src="https://cdnjs.cloudflare.com/ajax/libs/sockjs-client/1.5.1/sockjs.min.js"></script>
    <script src="https://cdnjs.cloudflare.com/ajax/libs/stomp.js/2.3.3/stomp.min.js"></script>
</head>
<body>
    <div id="messages"></div>
    <input type="text" id="messageInput" />
    <button onclick="sendMessage()">Send</button>

    <script>
        var socket = new SockJS('http://localhost:8080/ws');
        var stompClient = Stomp.over(socket);

        stompClient.connect({}, function(frame) {
            stompClient.subscribe('/topic/messages', function(messageOutput) {
                var messagesDiv = document.getElementById('messages');
                messagesDiv.innerHTML += messageOutput.body + '<br/>';
            });
        });

        function sendMessage() {
            var messageInput = document.getElementById('messageInput');
            stompClient.send("/app/chat", {}, messageInput.value);
            messageInput.value = '';
        }
    </script>
</body>
</html>
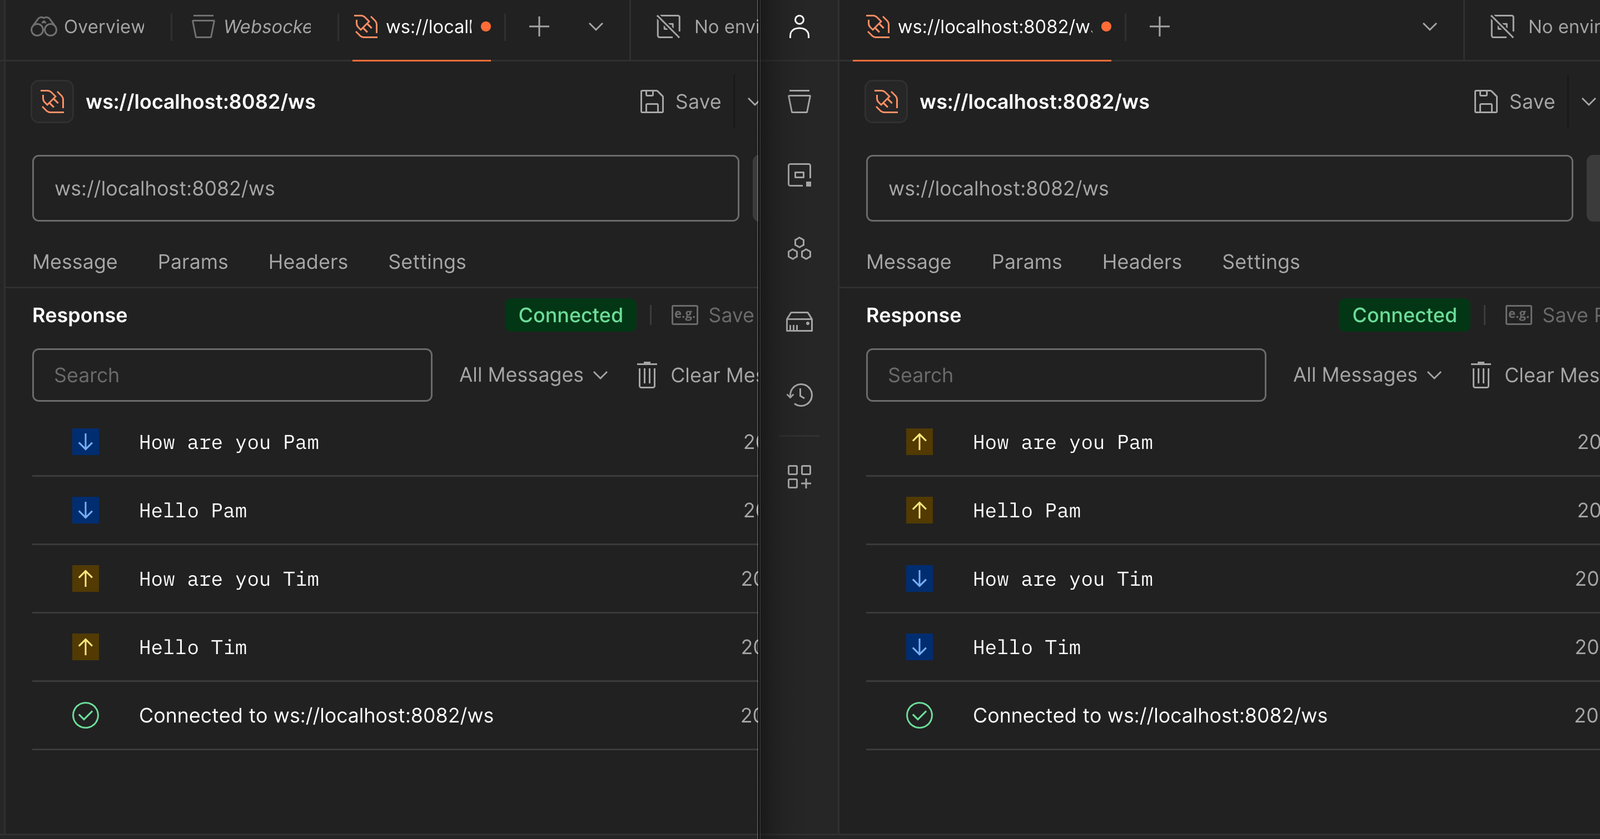
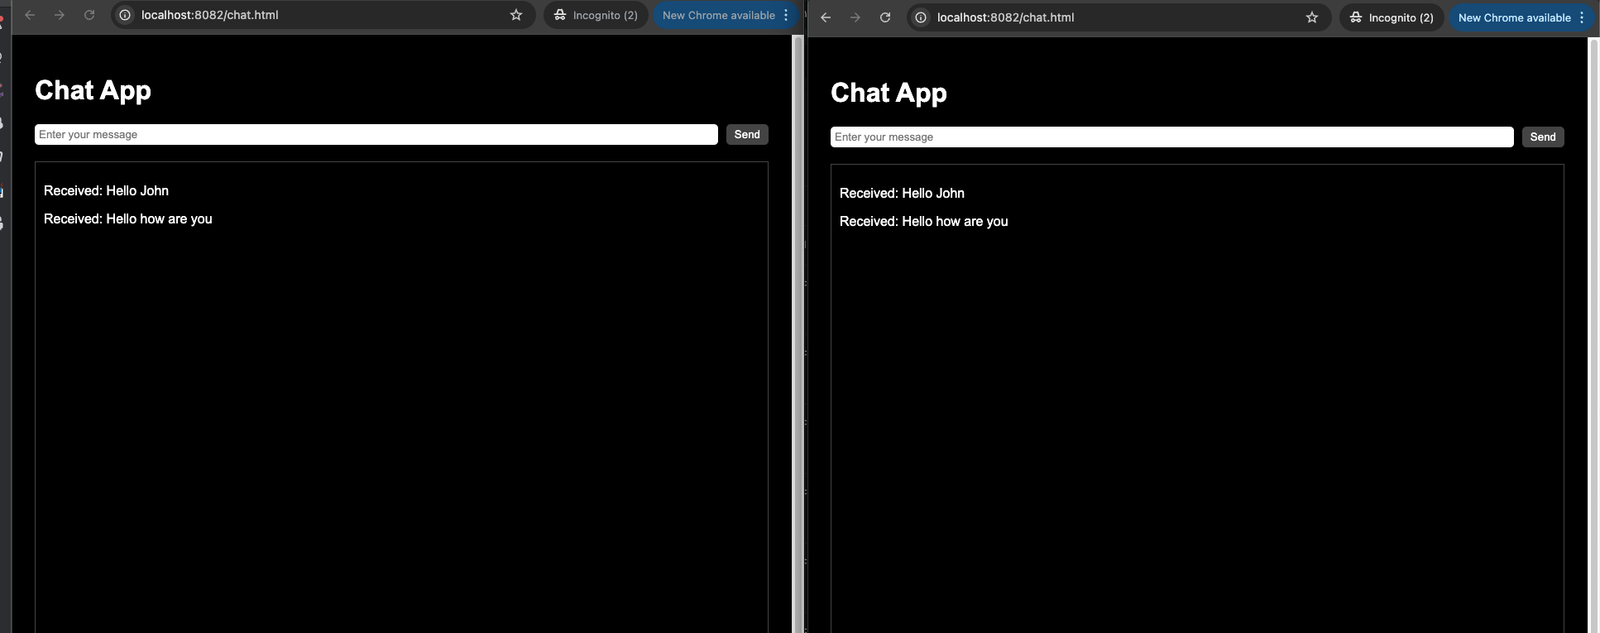
Run the Spring Boot application and open http://localhost:8080/chat.html in a browser. You should be able to send and receive messages in real-time like below:
WebSockets provide a powerful mechanism for building real-time applications. Spring Boot simplifies WebSocket implementation with both simple and STOMP-based approaches.
To stay updated with the latest updates in Java and Spring follow us on linked in and medium. You can find the code used in this blog here
Learn how to build an AI-powered stock portfolio advisor using Java, Spring Boot, LangChain4j, and OpenAI/Ollama. This guide walks you through integrating AI into your application to provide real-time investment advice based on the latest stock data.
This guide explores the features and usage of the RestClient introduced in Spring 6, providing a modern and fluent API for making HTTP requests. It demonstrates how to create and customize RestClient instances, make API calls, and handle responses effectively.
Find the most popular YouTube creators in tech categories like AI, Java, JavaScript, Python, .NET, and developer conferences. Perfect for learning, inspiration, and staying updated with the best tech content.
Get instant AI-powered summaries of YouTube videos and websites. Save time while enhancing your learning experience.